
Daryl Mitchell: Reading a Middle-Order Innings
Learn how to analyse Daryl Mitchell’s batting through match situations, partnerships and scoring choices, using a clear scorecard checklist.

Daryl Mitchell's middle-order batting is best understood by asking what New Zealand needed when he arrived, how he changed the scoring pattern, and what choices were available against each bowler. A final score answers only one part of that story. Useful batting analysis connects the entry score, partnerships, field placement and dismissal to the team objective.
Official New Zealand and Canterbury records identify Mitchell as a right-hand batter. This guide uses his name as a starting point for learning to analyse an innings, rather than assigning a fixed label to every appearance. His batting position and responsibilities must be checked on the particular scorecard. The numerical examples below are hypothetical exercises, not claims about his match record.
What should you record when Daryl Mitchell comes to the crease?
Record the team score, wickets lost, overs completed, opposition bowlers and target before judging Mitchell's first scoring decisions. Those details establish whether the immediate task is survival, rebuilding or acceleration. They also explain why the same personal score can have quite different value in two separate innings.
Suppose a batter arrives at 35 for three in an ODI innings. There may be plenty of deliveries remaining, but losing another specialist could expose the lower order. Compare that with arriving at 190 for two with twelve overs left. The second situation offers a stronger platform for boundary hitting, even though both appearances could begin at number five.
Write down the wickets in hand as well as wickets lost. The former encourages you to think about resources still available. Identify whether the partner is established, newly arrived or a bowler with limited batting responsibility. A cautious opening over alongside a settled scorer can be reasonable; two batters becoming stuck together may create a different problem.
The entry score sets a baseline for later comparisons. Without it, phrases such as “rescued the innings” or “wasted the platform” become impressions rather than arguments. Record the facts first, then explain what those facts suggest about the available choices.
How do you distinguish rebuilding from slow scoring?
Rebuilding should restore a workable scoring pattern while reducing the immediate threat of another wicket. Look for strike rotation, improving contact and a developing partnership, rather than simply accepting a low strike rate as evidence of patience. The question is whether the innings becomes healthier as the batter settles.
Count dot balls within short passages. Six dots spread across several overs may be less damaging than six consecutive dots that allow a bowler to settle. A single can interrupt pressure and move the established partner back on strike. Conversely, a risky single to an alert close fielder may create danger without a worthwhile benefit.
Compare the batter's scoring with the available deliveries. If several balls are well directed, defending them can be sensible. If repeated full tosses or short deliveries go unpunished, the explanation changes. Television graphics rarely tell you which opportunities were missed, so combine the scorecard with a full over when possible.
A hypothetical start of 12 from 20 balls need not define the entire innings. If the next twenty balls bring 28, the batter has reached 40 from 40. Discuss the change in intent and execution instead of preserving an early percentage after the situation moved on.
Separate outcome from process
A well-chosen shot can find a fielder, while a poorly controlled edge can reach the rope. Describe both the decision and the result. This distinction makes your assessment more useful than praising every boundary or condemning every dot.
Which numbers explain a middle-order innings?
Use runs, balls faced, batting strike rate, partnership runs and the scoring sequence together. Each describes a different aspect of batting. The strongest interpretation explains how these measures interact with the match situation, rather than treating one number as a complete assessment of performance.
Batting strike rate is runs divided by balls faced, multiplied by 100. In a hypothetical innings of 63 from 70 deliveries, it is 90. That calculation describes speed, but it does not reveal whether the batter entered after a collapse, faced difficult pace bowling or supported a partner scoring faster.
Batting average addresses runs per dismissal across a selected record. A player finishing not out has not added a dismissal to its denominator. An average and an individual strike rate therefore answer different questions. Neither should be substituted for the other when discussing a particular contribution.
Boundary percentage can mean different things in different graphics. Specify whether you mean the share of runs scored in fours and sixes or the share of balls hit for boundaries. If 30 of 60 runs came through boundaries, half the runs were boundary runs. That does not mean half the deliveries reached the boundary.
| Measure | Useful question | Important limitation |
|---|---|---|
| Runs and balls | How much and how quickly? | Arrival conditions still matter |
| Partnership runs | What happened while the pair were together? | Includes both batters and extras |
| Dot-ball sequence | Where did pressure accumulate? | Does not show delivery quality |
| Scoring zones | Which areas produced runs? | Field changes alter options |
How should you read his scoring against spin bowling?
Study footwork, contact point, available gaps and changes in length when analysing Mitchell against spin bowling. A batter can pressure a spinner through singles and changes of position as well as lofted shots. Watch whether the scoring option fits the delivery and the field instead of expecting constant attacking strokes.
Start with a simple map of long-on, long-off, deep midwicket and the close fielders. A straight drive along the ground may be available when a lofted hit would target a boundary rider. If the field moves back, the opportunity for a soft-handed single may improve. Rotation and boundary hitting therefore support each other.
Observe whether he meets the ball near its pitch or allows it to arrive later. Moving forward does not automatically mean attacking, and moving back does not automatically mean defending. A shorter delivery may create time to work the ball square; a full length can invite a straight option.
Do not invent a technical weakness from one sweep or one missed drive. Ask whether the bowler had established a pattern, whether the ball turned and whether the shot was a necessary response to rising pressure. A meaningful conclusion requires several comparable deliveries.
Track the bowler's response
After a boundary, note whether the bowler changes pace, line or trajectory. The next ball can reveal the tactical exchange more clearly than the boundary itself. Record what is visible without claiming to know either player's private plan.
What changes when he faces pace bowling?
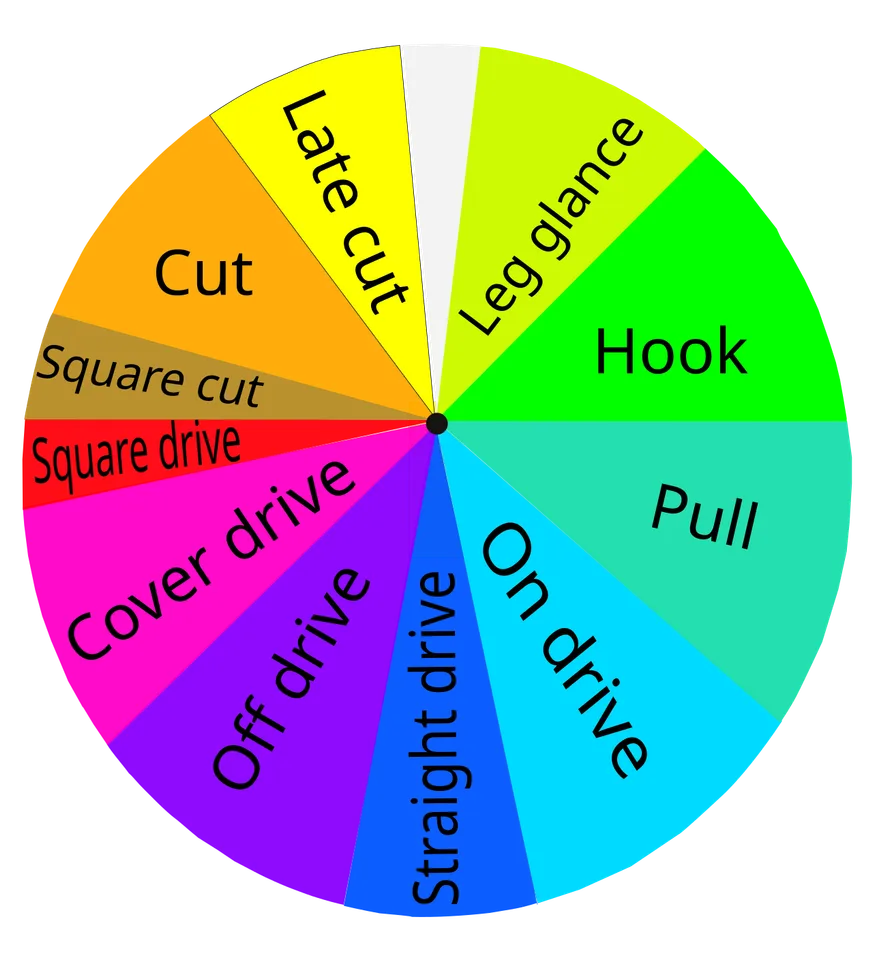
Use this batting-shot map to connect scoring areas with field placement; it is an instructional diagram, not a player innings chart.
Against pace bowling, assess line, length, movement and the field before discussing a batter's response. A new ball and an old ball can present different challenges, but conditions vary. Connect the actual delivery with the shot rather than attach a permanent reputation to a single dismissal.
A short ball near the body can reduce room for a pull shot; a wider short ball may offer a different scoring angle. Similarly, a cover drive depends on the line and how much the delivery moves. Simply naming the stroke does not establish whether it was a reasonable option.
Watch the contact position and balance after impact. A batter reaching far away from the body may be taking more risk than one meeting a similar delivery beneath the eyes. Camera angles can distort these details, so avoid precise claims when the available view is poor.
Variation matters late in an innings. A slower ball can disrupt timing, while a very full delivery can limit elevation. Look for the preceding balls: the setup may explain why a batter committed early. A single freeze-frame cannot show that sequence.
How do partnerships change the interpretation?
A partnership is a shared scoring period that includes both batters' runs and applicable extras. Analyse who faced which bowlers, how the strike moved and what happened after difficult overs. This shows whether Mitchell's contribution helped the pair solve the innings problem, even when his partner made more runs.
Imagine a hypothetical stand of 80 in which one batter contributes 32, the other 44 and extras supply four. Calling the first batter unimportant because he scored fewer runs misses his possible role in handling a difficult spell. Equally, the partnership total alone cannot prove that every individual decision was effective.
Running between wickets is revealing. Watch the non-striker's backing up, the first call and the decision to turn for a second. A well-judged two can compensate for a boundary denied by an excellent fielding effort. A poor call can undo several overs of rebuilding.
Describe the division of responsibility rather than assuming a dominant partner did all the work. One batter may target spin while the other handles the quicker bowler. Such an arrangement should be supported by delivery-by-delivery evidence, not inferred solely from batting styles.
How should you assess acceleration during a run chase?
Assess acceleration by comparing runs required, legal balls remaining, wickets in hand and the available bowlers. The required run rate identifies the scoring demand, but it does not prescribe an identical shot on every ball. Effective risk management responds to opportunities while protecting the team's remaining options.
Consider a hypothetical target requiring 72 from 60 balls. The required rate is 7.2 per over. A boundary followed by four singles and a dot produces eight, keeping the chase moving without six attempted big hits. A later over yielding only three changes the demand and may force a response.
Phase labels help organise the analysis. Powerplay conditions, middle overs and death overs create different fields and scoring incentives under the relevant playing conditions. Confirm the format's actual restrictions instead of borrowing assumptions from another competition.
Compare a T20 innings with another T20 innings before moving to an ODI innings. A Test innings may instead involve managing sessions, building a lead or batting for time. The skills overlap, but the objectives and acceptable risks can differ substantially.
Use a rolling view
Calculate what remains after each over rather than freezing the required rate at the start. This makes a late acceleration easier to explain. It also exposes cases where an attractive personal score leaves too much work for the remaining batters.
How can a student write a fair innings assessment?
Build an evidence chain: describe the situation, identify two important passages, explain the partnership and assess the dismissal. Finish with a conclusion proportional to the evidence. A single innings can support a specific observation, but it rarely establishes a permanent strength, weakness or change of role.
Choose a complete appearance rather than a boundary compilation. Note the first ten balls, the most productive over and the passage immediately before the dismissal. Add scoring zones if video permits. When only a scorecard is available, discuss measurable outcomes and leave technical explanations open.
An observation might read: “The batter began with limited scoring opportunities, rotated more frequently after the field spread, and increased boundary attempts as the required rate rose.” To turn that into a claim about Mitchell, attach the actual fixture and supporting sequence. Never paste a hypothetical description onto his record.
Sample size matters when comparing innings. Select comparable formats, batting positions and opposition quality. Include difficult games as well as successful ones, and explain exclusions such as an abandoned chase. Selecting only memorable performances creates a misleading picture of consistency.
A practical final review
Before sharing your note, check whether every number belongs to the same innings and whether the partner's contribution is represented fairly. Recalculate any rate involving partial overs using legal deliveries. Make sure a team's total has not been confused with a batter's runs, and distinguish visible facts from your interpretation.
Read the conclusion once more without the player's name. If it would fit almost any batter, add the specific passage that makes it informative. Useful analysis explains how the innings worked: the adjustment that released pressure, the partnership that restored options, or the decision that changed the chase.
Keep a second column for uncertainty. An unavailable camera angle, missing ball-by-ball entry or incomplete injury report should reduce the confidence of the relevant conclusion. This is more precise than declaring the entire innings impossible to assess. Most matches offer enough evidence for useful, limited observations.
A good Mitchell study should leave the reader able to watch the next innings more carefully. The aim is to recognise the relationship between scoring choices and team needs, then describe that relationship accurately with evidence from the match.
For a final classroom exercise, give two readers the same run chase and ask them to work independently. One records the scoring pattern, while the other records the field and bowling changes. Compare the notes before writing a judgement. Differences often reveal an assumption: one reader may have counted every attacking shot as necessary, while the other overlooked the rising rate. Resolve that disagreement using the actual sequence. Keep the resulting paragraph short enough that every sentence has a purpose, but retain the numbers needed to reproduce the argument. This approach turns watching cricket into an exercise in reasoning, not just an opportunity to repeat a commentator's verdict.
For another view of the same innings problem, compare Santner’s spin and field-setting analysis with the batting choices described here. The all-rounder role guide explains why batting position changes opportunity, while the ODI scorecard lesson provides the arithmetic behind a chase. Use the three perspectives together when a score alone seems to support conflicting interpretations.
Sources
Image credits: Cover: Kiwi Flickr, source, CC BY 2.0. Resized and converted to WebP. Article image: Nichalp, source, CC BY-SA 2.5. Resized and converted to WebP.
Found an error or an outdated detail? Report a correction with the article URL and original source.