
Mitchell Santner: Spin, Captaincy and Match Context
Explore Mitchell Santner’s cricket through spin-bowling decisions, field settings and captaincy context, with a practical match-analysis checklist.

Mitchell Santner's cricket is useful to study through two connected questions: how does his spin bowling change a batter's options, and how do the surrounding tactical decisions affect that contest? Wickets and economy rate matter, but they are the result of a sequence involving delivery choice, field setting, partner pressure and the game situation.
New Zealand's archive identifies Santner as a left-arm orthodox bowler. Dated selection reports can establish particular leadership arrangements, but this article assesses the skills rather than claiming a current appointment or latest result. All numerical match examples are hypothetical. The aim is to give readers a repeatable way to examine spin and captaincy in a real fixture.
What should you watch before Santner bowls an over?
Record the score, innings phase, batter's handedness, field and remaining bowling options before assessing the over. These details reveal the problem the bowler is trying to solve. Without them, a boundary or wicket can be mistaken for proof that a particular plan was either foolish or brilliant.
Start with the batter already on strike. Is the batter settled, newly arrived or trying to recover after a quiet passage? A spinner entering against an established partnership faces a different challenge from one bowling immediately after a wicket.
Next, map the scoring protection. Note long-on, long-off, deep cover and midwicket, and whether there is a slip. You need not draw every fielder perfectly. A rough diagram identifying the main protected areas is enough to explain why one scoring option appears safer than another.
Check the bowling allocation still available to the team. A captain may use spin now to preserve a quicker bowler for the death overs. That decision can be reasonable even if the spinner's over is not the most economical of the innings.
Finally, record the initial required run rate in a run chase. It supplies a baseline against which to understand the batter's urgency. Update it after the over instead of assuming that the same pressure continues unchanged.
How do flight, drift, dip and turn differ?
Flight describes the ball's path through the air, drift is sideways movement before pitching, dip is a sharper downward component, and turn is deviation after the bounce. These terms describe different observations. Use them only when the available angle supports the distinction, rather than treating every awkward shot as evidence of all four.
A delivery can challenge the batter through pace variation and trajectory even when obvious turn is limited. A flatter ball may reduce time to advance, while a slower, higher delivery can invite a shot that requires different timing. Neither option is automatically superior.
Watch the point where the batter commits. A player stepping forward early may find that the delivery arrives shorter than expected. Another waiting deep in the crease may be hurried by a quicker ball. The contest concerns time and position as much as the amount of visible spin.
Camera angles can exaggerate apparent movement. Compare the ball with stable pitch markings and watch more than one delivery before describing a pattern. If the broadcast does not provide a useful view, a modest statement about trajectory is better than an invented measurement.
Keep technical language observable
Write “the batter reached forward and made contact away from the body” when that is visible. Calling it a planned deception requires stronger evidence. Good technical analysis is specific about movement without pretending to know the bowler's private intention.
Why do line, length and angle matter more than a spin label?
Line and length determine the immediate scoring and defensive options, while angle changes how the delivery approaches the batter. A left-arm orthodox label identifies a bowling style; it does not explain the quality of each ball. Evaluate the actual release and landing area before judging the response.
Against a right-handed batter, the bowler's angle and expected deviation can interact in several ways. Against a left-handed batter, the relationship changes. The handedness label is a starting point for observation, not a guarantee that one matchup will be favourable in every setting.
Watch whether Santner changes his position along the crease. A different release point can alter the angle without requiring a dramatic change in the delivery's speed. It can also change which straight or square scoring option the batter perceives.
Length affects the batter's movement. A full ball may be driven, a shorter one may invite a back-foot shot, and a length between those options can create hesitation. The useful question is whether the delivery allowed the batter to use an intended scoring area comfortably.
Do not judge the bowler only by the shot's result. A mishit can land safely beyond a fielder, and a well-timed stroke can be caught. Describe delivery, response and field together. That gives readers enough information to understand the event without relying on an adjective such as “unplayable.”
How does the field work with the delivery?
The field and delivery should be interpreted as one tactical arrangement. Protected boundaries, catching positions and available singles shape the batter's choices. A spinner may concede a particular scoring option to reduce the danger elsewhere, but the actual ball still has to support the chosen protection.
Suppose a hypothetical field places long-on and deep midwicket back while keeping cover closer. A ball directed toward the pads may bring the protected leg-side areas into play. A wide short ball could instead create an easy shot toward an unprotected gap. The mismatch matters more than the field diagram alone.
A boundary fielder does not make a lofted shot harmless. It changes the risk by placing someone in a likely landing area, while distance, wind and timing remain relevant. Avoid describing every catch near the rope as proof of a perfect trap.
Field changes after a boundary deserve attention. Moving a fielder can open a different gap, and the batter may exploit it through strike rotation. The next two balls often reveal whether the bowler and captain have adjusted coherently.
A slip can indicate an attacking opportunity, but its removal does not automatically mean surrender. Match phase and scoring demand may justify a different balance. Explain what the change protects and what it concedes.
| Observation | Question to ask | Evidence needed |
|---|---|---|
| Boundary protection | Which shot is being discouraged? | Field map and line |
| Close catcher | Is a specific edge being targeted? | Length and movement |
| Quicker delivery | Does it reduce reaction time? | Comparable video angle |
| Bowling change | What resource is being saved or used? | Remaining allocation |
When is an economical spell more valuable than a wicket-taking one?
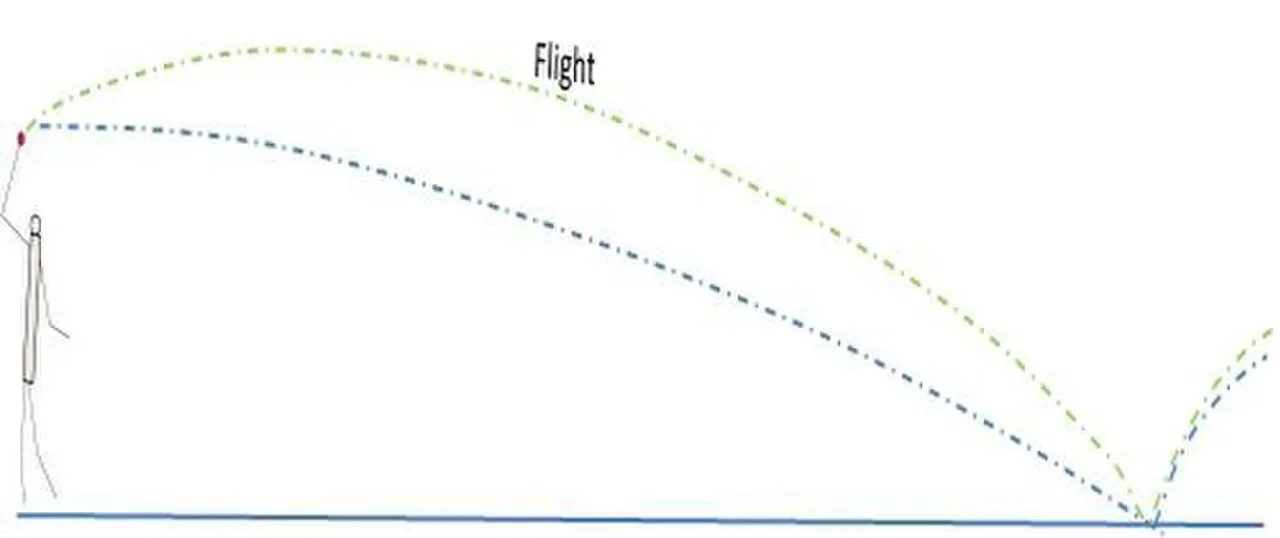
This instructional flight diagram helps separate the airborne trajectory from movement after pitching; it does not chart a Santner delivery.
An economical spell can be valuable when it increases the batting side's scoring demand or allows another bowler to attack. Wickets remain important, but their value depends on timing and replacement batters. Compare the contribution with the team's task instead of assuming that wickets and containment are opposing goals.
Consider a hypothetical chase needing 60 from 48 balls. If an over costs four, the requirement becomes 56 from 42, or eight runs per over. The spinner has changed the pressure even without a wicket. A later attacking stroke may arise partly from that increased demand.
However, an economical spell against batters who are deliberately consolidating may not have the same significance. Check whether the side remained comfortably ahead of its target. Low cost alone does not prove that the bowling altered the match.
Read dot balls in sequence. Three dots followed by a boundary and two singles yield six runs, but they tell a different story from six singles. The first may indicate pressure and release; the second may reflect a field that willingly allows rotation.
Economy rate should therefore be accompanied by phase, wickets and the partnership state. Use the scorecard to establish the numbers and commentary or video to examine how they developed. Avoid assigning a numerical share of a later wicket to pressure unless a defined analytical method supports it.
How can you assess captaincy without judging only the outcome?
Assess a captain's decision using the information and options available at the time. The final outcome matters, but it cannot alone establish whether the choice was sound. Identify the alternatives, constraints and intended problem before explaining what the result suggests about the decision.
A bowling change might introduce spin against a particular batter or preserve another bowler's workload. Ask who else could have bowled, how many overs remained and which phase was approaching. Without that comparison, “should have used someone else” is not a complete argument.
Separate selection of the bowler from execution of the over. A reasonable allocation can be undermined by poor length. Conversely, a risky matchup can succeed because a batter mishits. Treating captaincy and delivery quality as identical prevents you from learning from either.
Communication also matters, but broadcast pictures provide only fragments. A field discussion may reflect a bowler's request, a captain's suggestion or shared planning. Describe the visible adjustment without assigning a conversation or emotional state that the recording does not reveal.
Compare two available choices
Write one sentence for the case in favour of spin now and one for saving it. Include resources, batter types and the score. Then evaluate the actual decision. This exercise is more revealing than inventing a perfect alternative after seeing what happened.
What changes between ODI, T20I and Test analysis?
The formats create different time pressures, allocations and objectives. ODI and T20I cricket require particular attention to limited resources and scoring phases, while a Test can involve extended pressure across sessions. Compare Santner's contribution within the selected format before drawing conclusions across formats.
In an ODI, middle overs can involve managing partnerships while preserving options for the finish. In a T20I, a single expensive over can represent a larger share of the allocation. A spinner may therefore be asked to adapt a similar skill to a much shorter decision window.
Test analysis should consider innings duration, the surface's development and how a spell supports the broader attack. A quiet passage can help build a wicket-taking sequence, but that claim still needs evidence. Merely bowling many overs does not establish sustained control.
Conditions interact with these tasks. Wind can affect flight, a surface may offer variable bounce, and dew can alter handling. Treat such factors as observations to verify, not automatic explanations whenever the figures are expensive.
A comparison sheet should use a separate section for each format. Record date, opposition, role and conditions, then compare similar tasks within each section. This prevents an unusual short-format appearance from overwhelming a wider long-format record.
How can you build a useful Santner match study?
Choose one complete spell and one significant captaincy decision, then trace the relationship between them. Record the initial situation, changes in field or delivery, and the resulting scoring pattern. End with one supported conclusion and one question that would require more matches or better footage.
Begin with the official match identity and the scorecard. Watch full overs where possible. Highlights often preserve wickets and boundaries while removing the quiet deliveries that created the tactical problem. If you use only highlights, restrict your conclusion to the passages actually shown.
Build a sample sheet with one row per legal ball. Note line, length, scoring area, runs and any field adjustment. Keep uncertain entries marked rather than forcing every delivery into a precise category. Consistent observation is more useful than elaborate terminology applied unevenly.
Next, identify a decision point. It could be introducing Santner, extending his spell or changing a boundary fielder. Describe the alternatives using the resources known at that moment. Then state how the next passage changed the match, keeping execution separate from allocation.
Give a partner the same sequence without your conclusion. Ask them to identify the most important adjustment and compare answers. If you disagree, return to the deliveries and field map. This creates a focused discussion about evidence rather than a contest between favourite players.
Write the conclusion at the right scale
A strong conclusion might say that a particular spell reduced easy singles while protecting a chosen boundary. A much larger claim about being the best spinner in the world would require a defined comparison and far more evidence. Keep the claim proportional to the sample.
Finally, preserve the distinction between Santner's own bowling and the wider team's contribution. A sharp fielding effort, another bowler's attacking spell or a partner's advice may be part of the sequence. Cricket tactics operate through several people. Recognising that interaction makes the analysis both fairer and more informative.
The result should explain how options changed: which scoring area narrowed, how the batter responded and what the captain could do next. Once those relationships are visible, wickets and economy rate become meaningful outcomes within an argument rather than isolated numbers at the top of a page.
For an additional comparison, examine one powerplay over and one over after the field spreads. Use the applicable restrictions to explain the different protection available, then compare the bowler's line and the batter's scoring areas. Keep the comparison descriptive if the pitches or opponents differ. The point is to see how a similar delivery can operate inside two different arrangements, and why the field must stay attached to the analysis rather than appear as a decorative diagram.
To understand the other side of the contest, read the middle-order batting analysis alongside your field map. The wicketkeeping observation guide adds the keeper’s positioning behind spin, while the ODI scorecard lesson supports the rate calculations. Together they connect bowling choice, batting response and the recorded outcome without collapsing them into one number.
Sources
Image credits: Cover: TimBray, source, CC BY-SA 4.0. Resized and converted to WebP. Article image: Rkghadai, source, CC BY-SA 3.0. Resized and converted to WebP.
Found an error or an outdated detail? Report a correction with the article URL and original source.